How to Create a Photo Slideshow That Wows

You can’t create a truly compelling photo slideshow by just dumping a folder of pictures into some software. The magic happens before you even click a single button. It all starts with the story you want to tell.
The best slideshows take the viewer on a journey. Think of it as the difference between flipping through a random stack of vacation photos versus watching a short film that makes your friends feel like they were right there with you. You need to map out a clear beginning, middle, and end.
Start with the Story, Not the Software
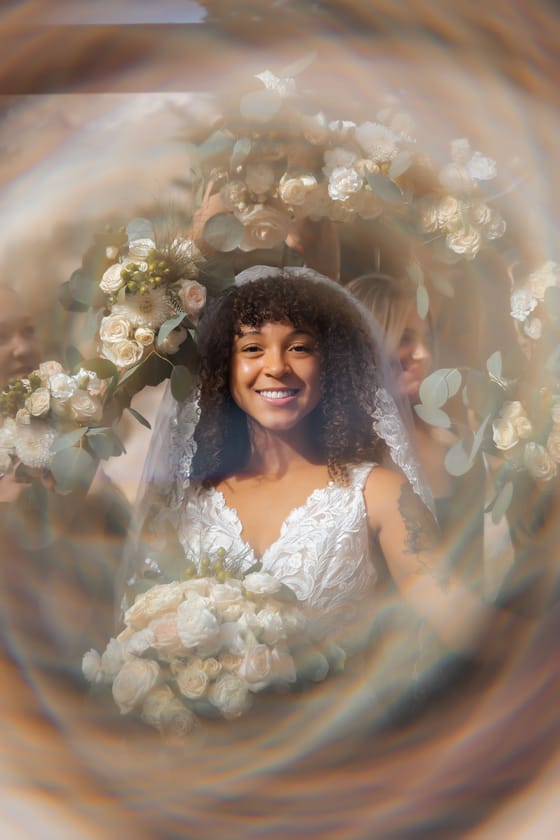
This story-first approach is universal. If you're making a wedding slideshow, the narrative is a love story—it starts with early dates, moves through the engagement, and culminates on the big day. For a corporate year-in-review, the story might follow a project's arc from a rough idea to a successful launch.
It’s about giving your photos context and purpose.
Know Your Audience and Set the Mood
Who are you making this for? Answering this question changes everything. A slideshow for a 50th birthday party with close family is going to have a completely different feel—warm, nostalgic, maybe a little goofy—than a presentation for potential clients, which needs to be sharp, professional, and results-driven.
Once you know who’s watching, you can nail down the emotional tone. Do you want people to laugh? Cry happy tears? Feel inspired? Deciding this upfront will guide every choice you make, from the photos you pick to the music you layer on top. Capturing genuine emotion is key, and understanding the secrets of candid photography can really help you choose images that connect.
This kind of strategic planning is a big reason why the tools for visual storytelling are so important. Presentation software, the backbone of slideshow creation, has grown into a major industry built on the power of a good story.
This infographic lays out a simple, three-part framework for mapping out your slideshow's narrative.
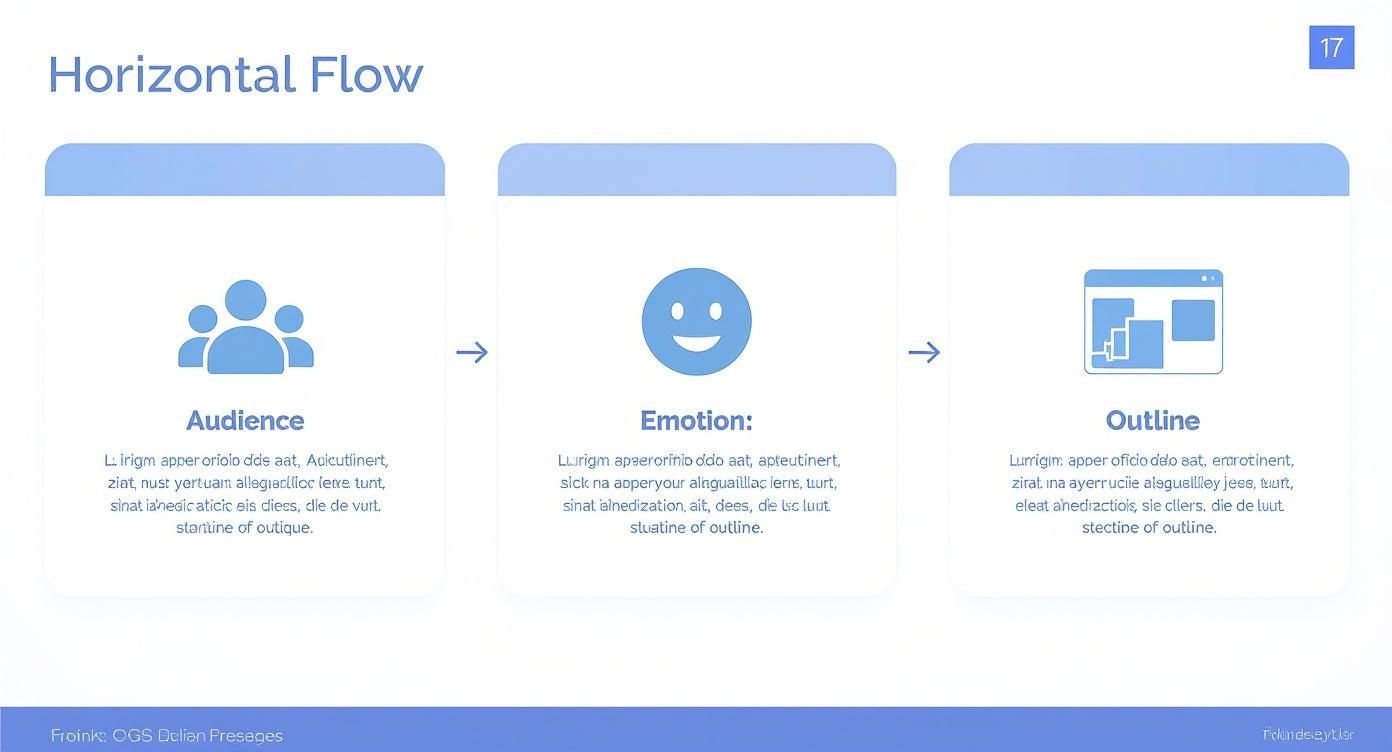
As you can see, getting your audience, tone, and outline aligned from the start gives your whole project a solid foundation.
Outline Your Visual Story Arc
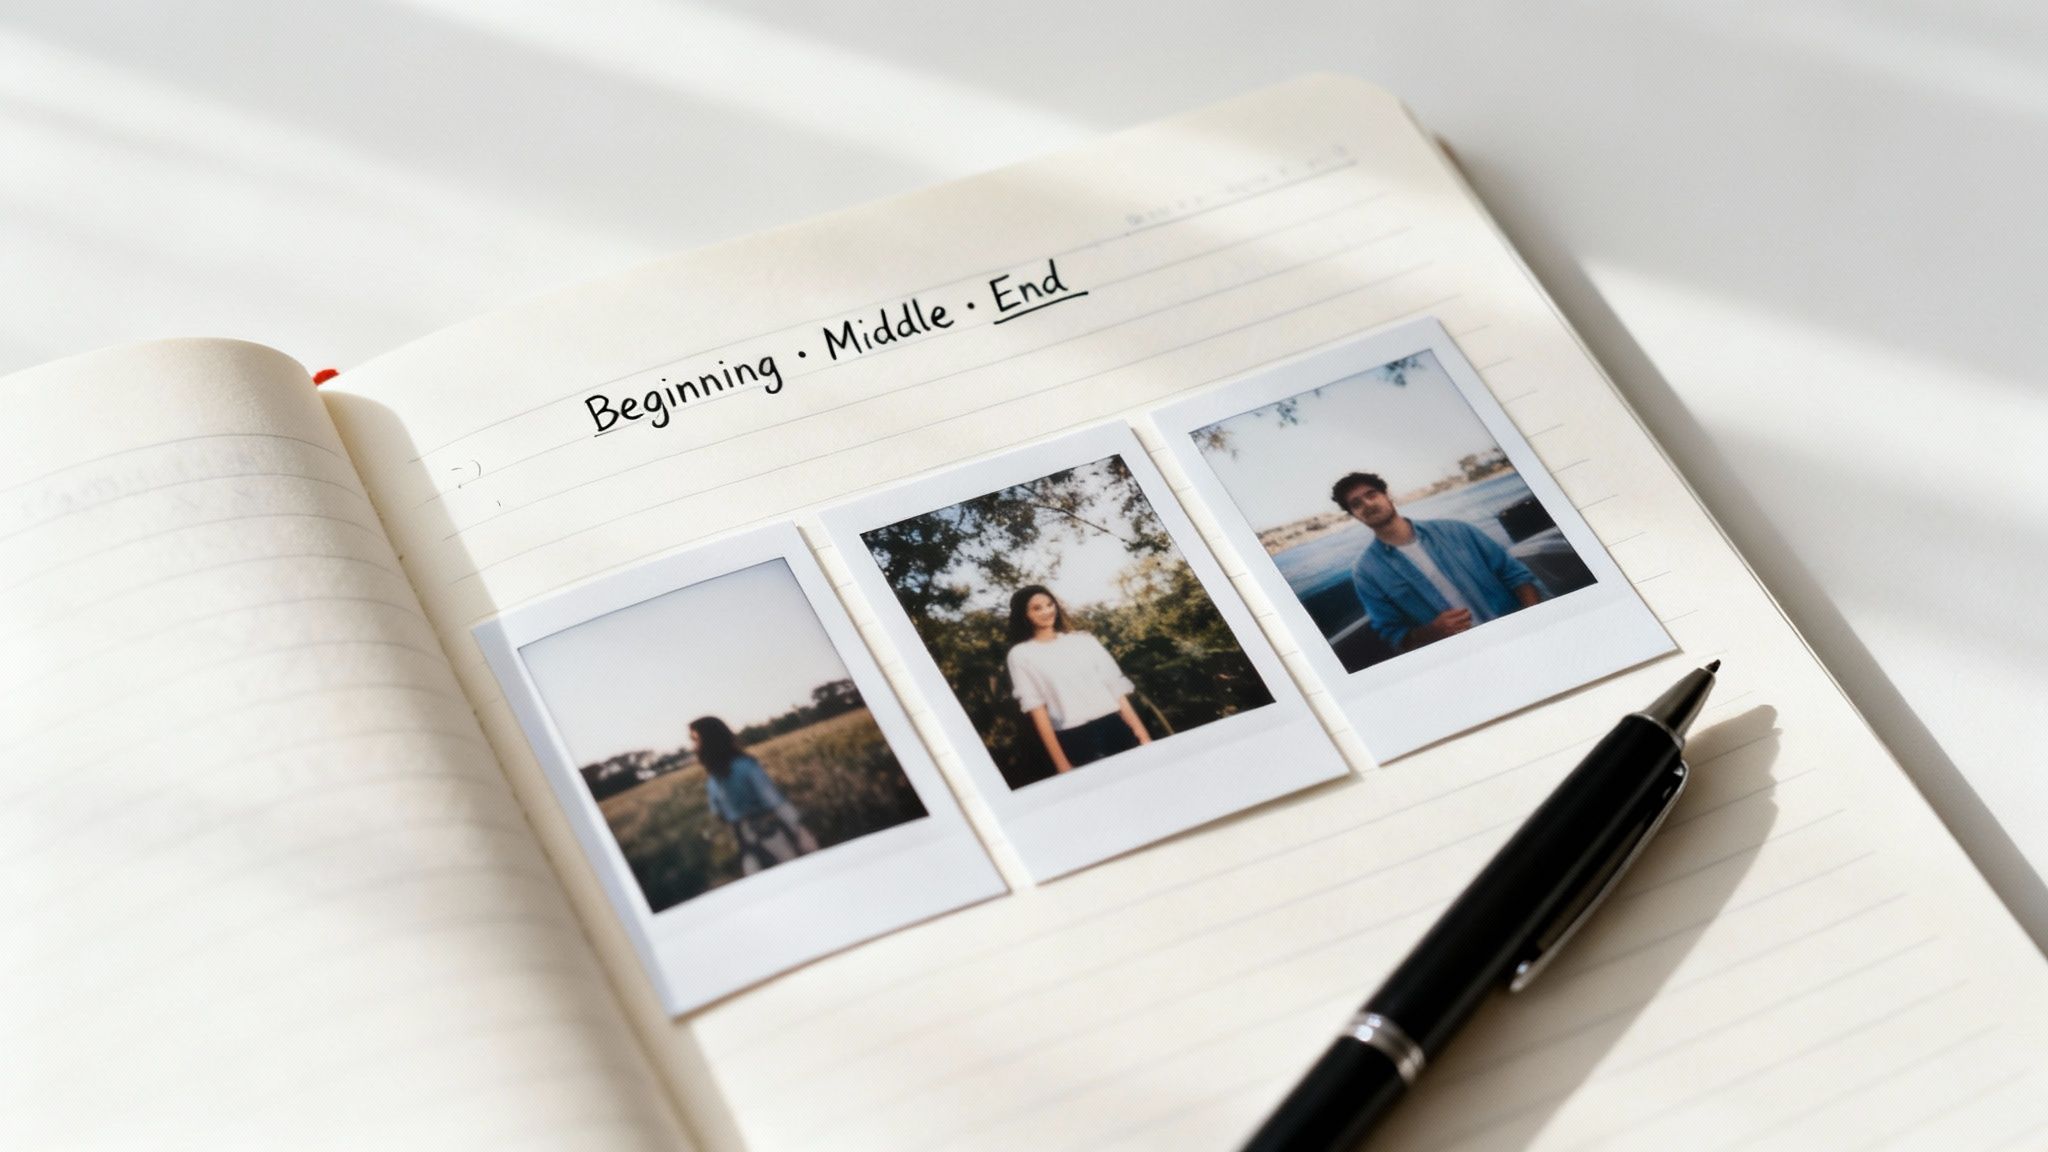
With your audience and tone locked in, it's time to sketch out the narrative. Keep it simple—the most effective stories usually are.
- The Beginning: This is your hook. Introduce the main character, theme, or setting. For a travel slideshow, this might be a few shots of packing bags and heading to the airport. It sets the stage.
- The Middle: Here's the heart of your story. This is where you build momentum with all the key moments and highlights. You can arrange them chronologically or group them by theme, but this section should be the most substantial.
- The End: You need a strong finish. Conclude with a powerful image that wraps everything up. Think of a final group photo, a stunning sunset, or even a simple "The End" or "Thank You" slide.
When you focus on the story first, every single photo has a job to do. That's what separates a forgettable flip-through from a professional-quality slideshow that actually sticks with people.
Curating and Organizing Your Visuals
With your story mapped out, it's time to gather your raw materials. This is where you put on your curator hat and start making tough choices about which photos and videos truly belong in the final cut. The biggest temptation here is to throw everything in, but trust me—less is almost always more.
Think about it this way: if you have twenty nearly identical photos of the same moment, picking the one that radiates the most emotion will hit harder than showing all twenty in a row. Your job is to select the absolute highlights that push the story forward, not to build a comprehensive photo archive.
Set Up a Simple Folder System
Before you even start dragging and dropping files, do yourself a huge favor and create a dedicated folder structure. This small act of organization will save you a world of headaches down the line. A good system keeps everything neat, tidy, and right where you expect it to be.
I've found this simple structure works wonders for just about any project:
- Main Project Folder: Give it a clear name, like "Mom's 60th Birthday Slideshow."
- 01 – RAW Images: This is your dumping ground for every possible photo and video you might use.
- 02 – FINAL SELECTS: As you find the winners, copy them into this folder. This becomes your curated library.
- 03 – Music: A designated spot for your soundtrack choices.
- 04 – Exports: This is where the final, rendered video file will live.
This method streamlines the whole process. As you sift through your raw files, you can just copy your favorites into the "FINAL SELECTS" folder. For more tips on getting your library in order, check out this excellent guide on organizing your family photos.
Prioritize High-Resolution Images
The quality of your source files directly impacts the quality of your finished slideshow. It’s that simple. Always, always use the highest-resolution images you can get your hands on. A photo that looks perfectly sharp on your phone can quickly turn into a blurry, pixelated mess on a large TV or projector screen.
Not sure how to check? Take a look at the image dimensions. For a standard Full HD (1080p) slideshow, you'll want your photos to be at least 1920 pixels wide. Anything smaller is a gamble and risks looking amateurish. Of course, getting great visuals starts long before the editing process. Knowing how to prepare for a photoshoot in the first place can make all the difference.
A slideshow is a visual medium, first and foremost. Low-quality images will undermine your story and distract the audience, no matter how powerful your narrative is. It's always worth the extra effort to track down the best possible versions of your photos.
Choosing Your Ideal Slideshow Maker

The tool you pick to build your slideshow will have a huge impact on both the creative process and the final product. Now that you've planned your story and organized your best shots, it's time to select the right software. The options range from dead-simple online tools to sophisticated desktop programs, so finding the best fit really comes down to your project's goals and your comfort level with technology.
This decision is more important than you might think. The global market for multimedia slideshow maker software was already valued at around $1.5 billion back in 2025 and is only getting bigger. This growth shows just how much we're all relying on visual storytelling. You can discover more insights about this growing market on datainsightsmarket.com.
Picking the right tool is a balancing act. It's about finding that sweet spot between features, ease of use, and cost. Let's break down the main categories to help you decide.
Slideshow Software Comparison
To help you navigate the options, here’s a quick comparison of the different types of tools available. Think about what you need to accomplish and which category aligns best with your project.
Tool Type
Ideal For
Key Features
Example Tools
Online Makers
Beginners, social media, quick personal projects
Template-driven, royalty-free music, web-based
Desktop Software
Professionals, high-end events, detailed storytelling
Timeline editing, keyframes, color grading, full control
Adobe Premiere Pro, DaVinci Resolve
Built-In Apps
Casual users, quick family shares, zero-cost projects
Basic transitions, automatic creation, pre-installed
Apple Photos, Google Photos, Microsoft Photos
Ultimately, the "best" tool is the one that lets you bring your vision to life without getting in your way.
Online Slideshow Makers For Quick Results
For most people, a user-friendly online platform is the perfect place to start. These web-based tools are built for speed and simplicity. You just upload your photos, pick a theme, add some music from their library, and you can have a finished video in minutes. They handle all the technical heavy lifting so you can focus on being creative.
- Pros: Super easy to learn, no software to install, and they usually come packed with royalty-free music and templates.
- Cons: You get less creative control over the finer details like precise timing and effects. Often, you'll need a subscription to remove watermarks or export in high quality.
These are fantastic for things like a quick recap of a family vacation, a social media story, or a simple birthday tribute.
Desktop Software For Maximum Control
When you need total creative freedom, nothing beats dedicated desktop software. Programs like Adobe Premiere Pro, Final Cut Pro, or the impressively free DaVinci Resolve give you granular control over every single element. You can manually set the exact duration of each photo, create complex animations, and perfect your color grading.
This path definitely has a steeper learning curve, but the creative ceiling is practically unlimited. It’s the go-to choice for projects where every detail counts, like a signature wedding slideshow for a client or a polished corporate brand video. Mastering these tools means you can also apply other advanced techniques, like these ways photographers can elevate images, directly within your video project.
Choosing a tool is a balancing act between power and simplicity. Don't pay for features you'll never use, but don't let a basic app limit your creative vision if you have something specific in mind.
Built-In Apps For Simple Needs
Before you spend any money, don't overlook the tools you probably already have. Both Windows (Photos app) and macOS (Photos app) have built-in features for creating simple photo slideshows. Even Google Photos offers a surprisingly capable movie-making tool that works on your phone or browser.
These options are fantastic for zero-cost, no-fuss projects. While they lack the advanced features of specialized software, they are perfect for quickly turning an album into a shareable video for family and friends without downloading or paying for anything new.
Bringing Your Slideshow to Life
This is where the magic really happens. You’ve got your story mapped out and your best photos picked—now it's time to stitch it all together into a moving, breathing video. The goal is to take a folder of still images and transform it into an experience that pulls your audience in from the very first frame.
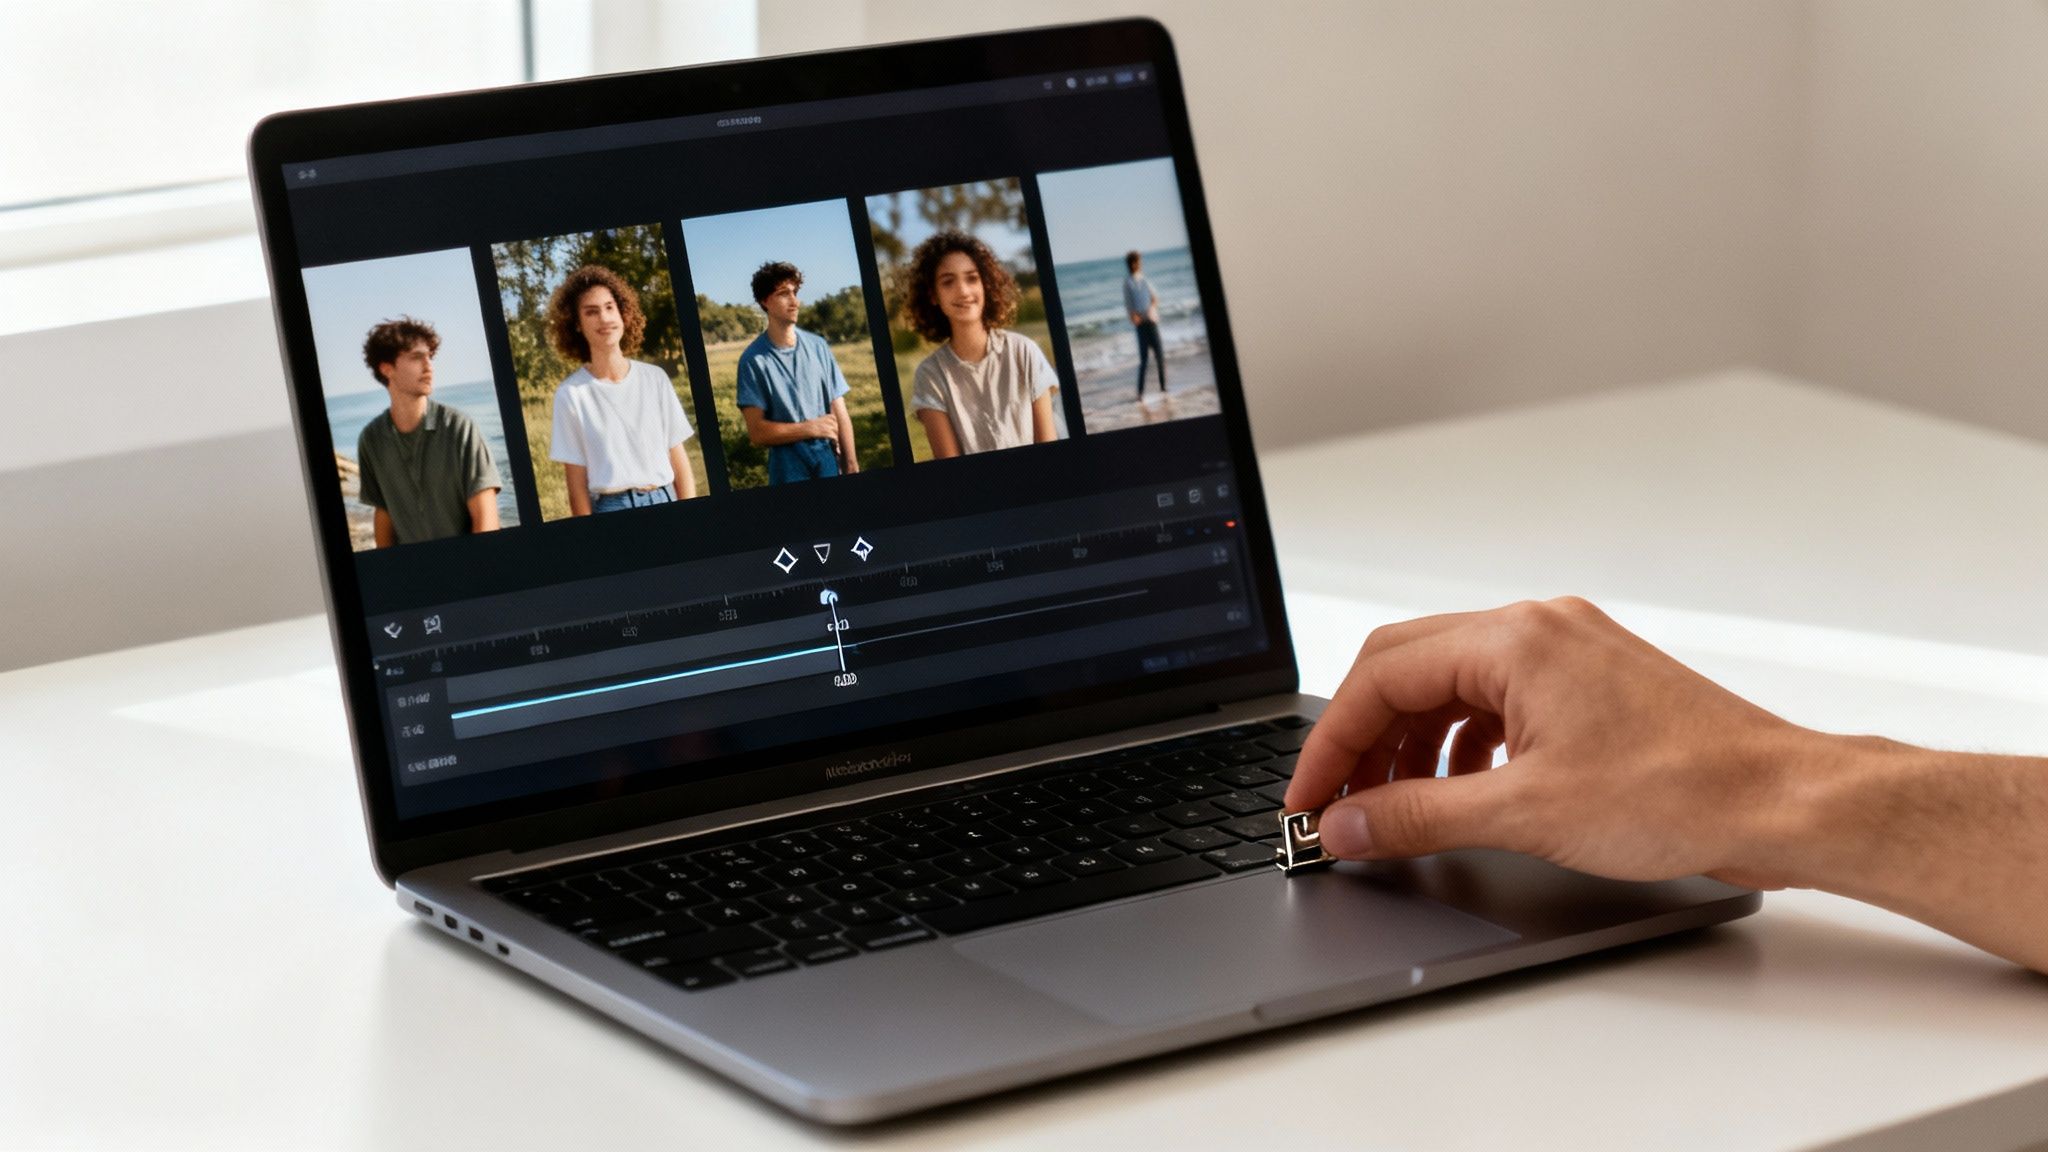
The first step is simply getting everything onto your timeline. Drag your photos into your video editor, arranging them to follow the narrative arc you planned. Think of this as your rough cut. Don't stress about perfect timing just yet; focus on getting the visual flow of your beginning, middle, and end right.
The Art of Pacing and Rhythm
Pacing is the heartbeat of your slideshow. It sets the energy and emotional tone for the entire piece, and you control it mainly with photo duration—how long each image stays on the screen. A common mistake is giving every photo the same screen time.
- Fast Pacing: For high-energy moments like a packed dance floor or a rapid-fire travel montage, use shorter durations. Think 2-3 seconds per photo to create a feeling of excitement and action.
- Slow Pacing: For those really important, emotional shots, stretch the duration to 5-7 seconds. A bride walking down the aisle or a breathtaking landscape needs that extra time for the viewer to soak it all in.
Varying the pace is what keeps people watching. A slideshow with one monotonous rhythm quickly becomes a bore. By strategically speeding up and slowing down, you create a dynamic flow that feels professional and intentional. For anyone just starting out, these essential video editing tips provide a fantastic primer on this very concept.
A great slideshow breathes. It has moments of high energy and moments of quiet reflection. Mastering the rhythm is key to creating an emotional connection with your audience.
Using Transitions That Serve the Story
Transitions are the bridges that connect your photos, but it's easy to go overboard. Your software probably offers a wild library of star wipes and 3D spins, but the best approach is almost always the simplest. Flashy effects just distract from your images.
Honestly, for 95% of your slideshow, you only need two transitions:
- Straight Cut: This is an instant switch from one photo to the next. It’s clean, professional, and keeps the energy moving. Make this your default.
- Cross Dissolve (or Fade): This is a gentle blend from one image into the next. Use it with purpose—to signal a passage of time, a change in location, or to soften the mood during an emotional sequence.
The philosophy here is surprisingly similar to professional filming. In fact, many of our favorite Top 10 Wedding Videography Tips touch on seamless storytelling and avoiding distracting edits, which is exactly what we're aiming for. Just think of transitions as punctuation, not the main event.
Adding Tasteful Text Overlays
Text can give your slideshow structure and provide key context, but less is always more. Think about using simple title cards at the start, chapter markers for different sections ("The Ceremony," "The Reception"), or some closing credits to add a polished touch.
When you do add text, follow a few simple rules:
- Readability is #1: Stick with a clean, simple font that's easy to read.
- Keep it Brief: No one wants to read a paragraph. Short phrases or single words are best.
- Contrast is Key: Make sure your text color stands out clearly from the photo behind it.
And please, try not to place text over important details, like a person's face. The best text enhances the story without ever stealing the spotlight from your photos.
Adding Polish with Music and Motion
Sound and movement are the secret ingredients that transform a simple collection of photos into a genuinely unforgettable experience. This is where you breathe life into your project, turning static images into a dynamic, flowing story. The right soundtrack and some subtle motion effects aren't just fancy add-ons; they're absolutely essential for creating real emotional impact.
Think of music as the soul of your slideshow. It sets the mood, drives the pace, and connects with your audience on a level words and pictures can't always reach. So, don't just pick a song you happen to like. You need a track that truly matches the emotional journey of your story. A playful, upbeat tune works wonders for a birthday montage, while a sweeping, instrumental piece can give a travel slideshow a grand, cinematic feel.
Selecting the Perfect Soundtrack
Finding the right music is a make-or-break step. When you're putting together a slideshow for something as significant as a wedding, the song choice carries a huge amount of weight.
So, where do you find that perfect track? The first instinct might be to grab a popular song off the radio, but that's a fast track to trouble. Copyright restrictions can get your video flagged or even taken down from platforms like YouTube. A much better approach is to explore dedicated music sources.
- Royalty-Free Music Libraries: Services like Artlist or Epidemic Sound have massive catalogs of high-quality music. You pay a subscription fee for access to tunes you can use without worrying about copyright strikes.
- Free Music Archives: If you're on a budget, the YouTube Audio Library is a goldmine. It offers a fantastic selection of free-to-use tracks right inside the platform.
Once you’ve chosen your music, really listen to its rhythm and structure. A great technique to make your slideshow feel incredibly professional is beat-matching—timing key photo changes to land on the strong beats of the song. For a little inspiration, check out our guide on the top wedding video songs to see just how powerfully music can set the tone.
Your slideshow’s soundtrack is its emotional guide. It tells the audience how to feel. A powerful image paired with the perfect music is what creates those truly memorable, goosebump-inducing moments.
Breathing Life into Still Images
A string of static photos, one after another, can feel a bit flat. The fix is to add subtle, purposeful motion. One of the most classic and effective techniques is the Ken Burns effect, which involves slowly panning and zooming across an image. This simple movement mimics a camera gliding across the scene, drawing the viewer's eye and adding a wonderful sense of dimension.
Almost every slideshow maker has this feature built right in. Use it to pan across a stunning landscape, slowly zoom in on a single smiling face in a group shot, or gently pull back to reveal a wider scene. The key here is subtlety. You want the motion to feel natural and gentle, not jerky or distracting.
Final Touches with Photo Enhancements
Before you hit that export button, take one last pass to make sure your photos look their absolute best. Most slideshow tools include some basic photo editing features, and you don't need to be a pro to use them. A few quick adjustments can make a world of difference.
- Color Correction: A little boost to the brightness and contrast can make an image pop right off the screen.
- Consistency: Try to give all your photos a similar color tone and feel. This helps the entire slideshow flow together smoothly without any jarring visual shifts.
The tools for these final tweaks are more accessible than ever, which is part of a much bigger trend toward easy photo editing, all because we love perfecting our digital memories. Sometimes, a simple color boost is the last little touch your slideshow needs to go from good to great.
Answering Your Final Slideshow Questions
As you get ready to hit that final "export" button, a few last-minute questions usually surface. I've been there. Getting these details right is what separates a good slideshow from a truly memorable one. Let's walk through some of the most common sticking points I see.
How Long Should My Slideshow Be?
There's no magic number here—the perfect length really depends on who's watching and where they're watching it. But after years of making these, I've developed some solid rules of thumb.
- Social Media: Think fast and punchy. For Instagram, Facebook, or TikTok, you've got to grab attention immediately. Aim for 1-3 minutes, max.
- Big Life Events: For weddings, milestone birthdays, or memorials, you have a captive and emotionally invested audience. You can stretch this out to 5-10 minutes to tell a complete story without viewers getting restless.
The real secret? Always choose impact over length. A tight, powerful 5-minute slideshow is always better than a rambling 15-minute one that makes people glance at their phones. As a starting point, I usually budget about 3-5 seconds of screen time per photo.
What's the Best Video Format for Exporting?
This one is refreshingly simple. When you're ready to export, go with MP4 (using the H.264 codec). It's the gold standard for a reason.
This format gives you a fantastic-looking video without creating a gigantic file that’s impossible to share. An MP4 will play on just about anything—your laptop, a smart TV, your phone—and it's the preferred format for platforms like YouTube and Vimeo. To make sure your photos look sharp, always export in at least 1080p (Full HD) resolution.
Can I Just Use My Favorite Song?
I get this question all the time. Using a chart-topping hit from your favorite artist sounds great, but it's a legal minefield if you don't have a license. This is especially true if you're posting it online.
YouTube and Instagram have sophisticated systems that will instantly flag copyrighted music. Your video could get muted, blocked in certain countries, or taken down entirely.
To stay out of trouble, the best move is to use royalty-free music. There are amazing libraries out there like Artlist and Epidemic Sound that have incredible tracks for a subscription fee. For free options, the YouTube Audio Library has a surprisingly good selection you can use without any worry.
How Can I Make My Slideshow More Interesting?
A great slideshow feels more like a short film than a click-through of photos. The key is to think like a storyteller.
Instead of just dropping photos in one after another, focus on creating a rhythm. Vary your pacing by combining quick-cut sequences with slower, more thoughtful moments. Bring your still images to life with subtle motion, like the classic Ken Burns effect (a slow zoom or pan).
If you have them, weaving in short video clips is a fantastic way to add energy and break up the static images. And here's a pro tip: let the music guide your edits. Try to time your most important photo transitions to land right on the beat of the song. It makes a world of difference and gives your project a polished, professional feel.
Crafting the perfect slideshow takes care and attention, but it all starts with capturing incredible moments. At Candid Studios, we specialize in turning life’s biggest events into visual stories that last forever. Let us worry about the photos, so you can live in the moment.
Discover our photography and videography services.